
How to Install a Holographic LED Screen on Glass: A Complete Step-by-Step Guide
If you’re looking to add a modern, eye-catching display to your storefront, office building, or public space, a holographic LED screen on glass is one of the most versatile and impactful solutions available.
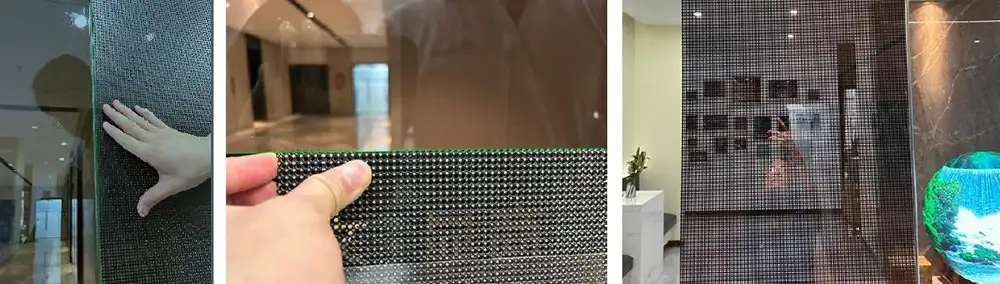
Unlike traditional LED displays that require bulky frames and permanent modifications, these transparent screens blend seamlessly with glass surfaces, preserving natural light and the building’s aesthetic while delivering vibrant, floating 3D visuals.
However, installing a holographic transparent LED screen on glass requires careful preparation and precise execution to avoid damaging the glass, ensure long-term stability, and achieve the best possible visual performance.
In this guide, we’ll walk you through every step of the process, from pre-installation checks to post-installation maintenance, using the practical, damage-free methods shown in our installation workflow.
Why Choose a Holographic Transparent LED Screen for Glass?
Before diving into the installation process, it’s important to understand why this type of display is becoming the preferred choice for modern commercial and architectural projects.
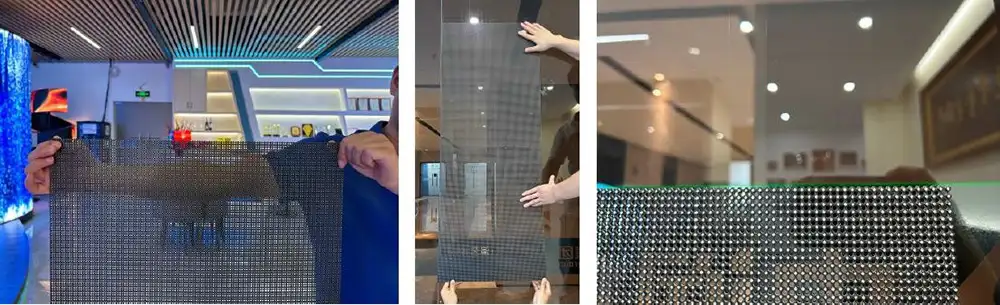
First, the core appeal lies in its transparency.
Unlike opaque digital displays that block views and natural light, holographic transparent LED screens allow light to pass through, maintaining the openness and natural feel of glass facades, storefronts, and interior partitions.
This makes them ideal for retail spaces, where you want to showcase products or promotions without hiding the store’s interior design, or for office buildings, where preserving the building’s architectural vision is a priority.
Second, the holographic effect creates a “floating” visual experience that traditional flat screens can’t match.
With high pixel density and advanced light-emitting technology, these screens project crisp, lifelike 3D images that appear to float in mid-air, capturing the attention of passersby and creating memorable experiences for viewers.
Finally, modern holographic transparent LED screens are designed with easy, non-damaging installation in mind.
As we’ll show you in this guide, many models can be installed using adhesive mounting methods, eliminating the need for drilling holes or modifying the glass or building structure.
This makes them suitable for both temporary installations, such as pop-up events or seasonal promotions, and permanent installations, such as storefront displays or building facades.
Pre-Installation Preparation: Key Checks and Tools
Before you begin the installation process, thorough preparation is essential to avoid mistakes, ensure safety, and guarantee a smooth, long-lasting result.
1. Glass Surface and Condition Assessment
The first step is to assess the glass surface where the screen will be installed. Not all glass is suitable for this type of installation, and failing to check these details can lead to safety hazards or installation failure.
- Glass Type and Strength: Most holographic transparent LED screens are designed for installation on tempered glass, which is stronger and more resistant to stress than standard glass.
- Glass Surface Condition: The glass must be clean, smooth, and free of scratches, chips, or cracks.
- Indoor vs. Outdoor Installation: If you’re installing outdoors, ensure the glass is weatherproof and rated for the local climate.
2. Gathering the Essential Tools and Materials
To install the screen using the damage-free method shown in our workflow, you’ll need the following tools and materials:
- Glass cleaner (ammonia-free) and microfiber cloths
- Isopropyl alcohol (for final surface cleaning)
- Measuring tape and level
- Non-marking tape or soft pencil
- Holographic transparent LED screen modules
- Adhesive mounting strips or pads
- Soft gloves
- Power and signal cables
Step-by-Step Installation Guide
Step 1: Clean and Prep the Glass Surface
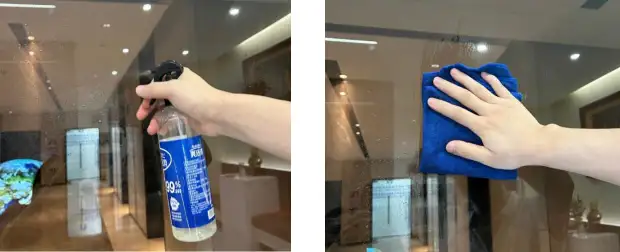
The success of the adhesive installation depends entirely on how clean and dry the glass surface is. Any dirt, grease, or residue on the glass will prevent the adhesive from bonding properly, leading to the screen falling off over time.
Initial Cleaning: Spray the glass surface with an ammonia-free glass cleaner and wipe it thoroughly with a microfiber cloth, removing all dust, fingerprints, and surface grime.
Deep Cleaning: For stubborn residue, use isopropyl alcohol and a clean cloth to wipe the area down. This step is critical for outdoor installations, where dirt and pollution can build up on glass surfaces.
Final Check: After cleaning, inspect the glass under bright light to ensure no streaks or residue remain. Allow the glass to air dry completely before proceeding.
Step 2: Mark the Installation Area and Align the Screen
Accurate alignment is key to achieving a professional, seamless look. Even a small misalignment can be noticeable once the screen is turned on, so take your time with this step.
Measure and Mark: Use a measuring tape and level to mark the exact position where the screen will be installed. Use non-marking tape or a soft pencil to create horizontal and vertical guidelines on the glass, ensuring the area is perfectly level and centered.
Dry Fit the Screen: Before applying any adhesive, hold the screen modules up to the glass and align them with your marked guidelines. This “dry fit” allows you to check the fit and make any adjustments before committing to the installation.
Step 3: Apply the Adhesive and Install the Screen Modules
Once the glass is clean and the alignment is confirmed, you can proceed with applying the adhesive and installing the screen modules.
Prepare the Adhesive: Most holographic transparent LED screens come with pre-applied adhesive strips or pads on the back of each module. If not, apply the adhesive strips evenly along the edges of the module, following the manufacturer’s instructions.
Align and Press the Modules: Carefully align the first module with your marked guidelines, then gently press it onto the glass. Start from the top of the module and work your way down, applying even pressure to ensure the adhesive bonds properly.
Repeat for All Modules: If your screen is made up of multiple modules, repeat the process for each one, aligning them with the previous module and your guidelines.
Allow the Adhesive to Cure: Most adhesives require at least 24 hours to reach full strength. During this time, avoid touching or applying pressure to the screen.
Step 4: Connect the Power and Signal Cables
Once the adhesive has cured, you can connect the power and signal cables to the screen.
Plan the Cable Route: Before connecting the cables, plan a clean, hidden route for the power and signal cables to avoid clutter.
Connect the Cables: Carefully connect the power and signal cables to the corresponding ports on the back of the screen modules.
Secure the Cables: Use cable clips or adhesive tape to secure the cables in place, preventing them from hanging loosely or interfering with the screen’s operation.
Step 5: Test the Screen and Final Adjustments
With the cables connected, it’s time to test the screen and make any final adjustments.
Power On the Screen: Turn on the power to the screen and check that all modules light up correctly. Look for any dead pixels, flickering, or uneven brightness.
Adjust the Alignment: If any modules are slightly misaligned, gently press them into place while the adhesive is still partially cured.
Optimize the Display Settings: Adjust the screen’s brightness, contrast, and color settings to ensure the visuals look their best in the specific lighting conditions of your installation space.
Common Installation Mistakes to Avoid
- Skipping the Glass Cleaning Step
- Misaligning the Screen
- Using the Wrong Adhesive
- Installing in Unsuitable Weather Conditions
- Overloading the Glass
Post-Installation Maintenance Tips
Regular Cleaning: Clean the glass surface and the screen’s LED modules regularly to remove dust and dirt. Use a soft, dry cloth to wipe the screen modules, and avoid using harsh chemicals or abrasive cleaners.
Check the Adhesive and Connections: Periodically inspect the screen’s adhesive to ensure it’s still bonded securely to the glass. Also, check the power and signal cables to ensure they’re not loose or damaged.
Protect the Screen from the Elements: If your screen is installed outdoors, consider adding a protective cover during extreme weather conditions, such as heavy rain or snow.
Update the Screen Content: Keep your screen content fresh and engaging by regularly updating the visuals.
Installing a holographic transparent LED screen on glass is a straightforward process when you follow the right steps and use the damage-free adhesive method. By taking the time to prepare the glass surface, align the screen accurately, and use the correct tools and materials, you can achieve a professional, long-lasting installation that enhances your space with stunning, floating visuals.
If you’re unsure about any part of the installation process, or if you’re installing a large or complex screen, it’s always best to consult a professional installer. They have the experience and expertise to ensure the installation is done safely and correctly, giving you peace of mind.
Ready to transform your glass surface with a holographic transparent LED screen? Contact our team today to learn more about our products and installation solutions.

Get Our Latest Products & News
Subscribe to our newsletter for fresh product launches, industry insights, and exclusive offers tailored for global partners. Stay ahead with updates that matter to your business!
